So I thought I would write a tutorial to describe how I paint minis these days.
First off, I think everybody reading this should know, I am not a great painter. I am generally cheap, impatient and easily frustrated. On top of that, I lack the patience, eye sight, fancy brushes and hand eye coordination to do fine detail work.
So is everybody excited now?
On the flip side, I think I do a pretty good job at selecting simple earthy color tones that make the minis I paint look much better than they would with a brighter palette. I am also constantly trying to experiment with new techniques in an attempt to improve my final results and make them both more efficient and esthetic.
 |
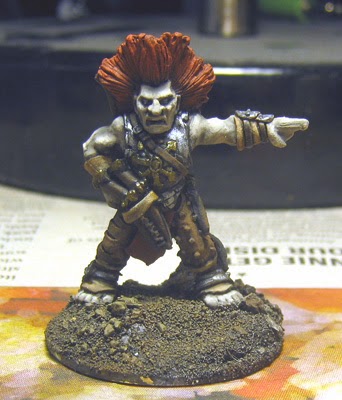
| The Marauder Chaos Thug I will be painting in all his 80's glory. |
 |
| This is my wet palette with a clean sheet of parchment paper freshly laid down. I suggest that everyone out there reading this make yourself one to try out if you haven't all ready. They are basically free and save you lots of time and paint. |
 |
| These are an example of the cheap craft paints I use. They don't cover as well as expensive miniature paints, but I like them because they go on with a semi-transparent quality. |
 |
| So here's where I start. The mini has been fixed to a base, primed grey, dry brushed white and the base has been sloppily painted and dry-brushed. |
 |
| These are the colors I use for "creepy guy" flesh tones. Flesh, cold brown and a little pale blue. I add white to the mix for the final highlights later on. |
 |
| I apply a mid tone flesh color, painted on fairly thin, with the above colors, to the skin areas of the mini. |
 |
| Next the hair. I decided red to make the mini stand out more and because red is more aggro. Again, this is a slightly thinned paint not meant to be opaqe. |
 |
| The same thinned paint, this time in a dark silver, to the metallics. I am using a larger brush to do all this, and I am not too worried about being overly neat. |
 |
| The browns. I start with the lighter browns and go darker. No shading is being done here though, just thinned base colors with the same thick brush. |
 |
| Finally the golds complete the base coats on the model. Total time here is about 15 to 20 minutes on this mini. |
 |
| Next are the washes. I didn't used to do washes. I would start with very dark base coats and add highlights on top of them. I have found that washes speed things up and look better as a final result. |
 |
| Here, all of the washes have been done. I mostly just used thinned standard paints as a wash. Sometimes I do thin the paint with some Secret Weapon brown and black washes I bought a while back. I used a thicker brush to apply and I still wasn't too concerned about neatness. This took maybe 5 to 10 minutes. |
 |
| This next method is often called black lining. Here, I used a thinned brown black mixture and a smaller brush to darken in the eye sockets, mouth and to separate area's on the mini to make them stand out more. This also cleans up the mini and corrects a lot of mistakes I made earlier. This step probably took about 5 minutes. I have tried "the dip" but to me the 15 minutes or so, it takes to apply washes and line the miniature are worth doing by hand. |
 |
| Whited out eyes. |
 |
| First layer of flesh high-lights and metals. I like my metals to be dabbed on to make the armor look uneven and weathered. |
 |
| more high-lights |
 |
| I usually do one layer at a time over the entire miniature. I then go back with a secondary lighter layer and sometimes a third. This is where the wet palette really comes in handy, as the paints don't dry as fast and you can keep adding lighter colors where you last left out. |
 |
| Some where in there I added pupils with a black micron pen. |
 |
| This was really only about two layers of highlights over the entire washed miniature. My highlights are pretty much done by now. |
 |
| I love this next step. It's super easy to do and looks great. Unfortunately, you can't see it to clearly in this photo. I add a very thin wash of red to the model's nose,cheeks and bottom lip, followed by a very thin wash of a blue-black for a five o'clock shadow. |
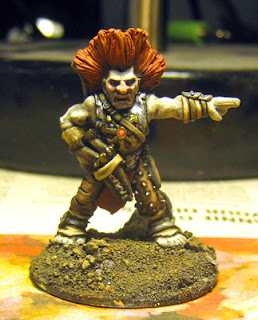 |
| I tried playing around with the color balance for this final picture so you can see the color and layers a little better. The only thing different in this picture and the last is I went back and did the leg studs on the mini's left leg. Dark silver, black wash on each stud and a final dot of plain silver for a high-light. |
So that's it for part 1. The highlights actually go very quickly. They probably took about 15 to 20 minutes to complete, plus an extra 5 to go back and do the leg studs. I am debating adding two streaks in his hair like the original model and a simple face tattoo.
Part 2 will be very experimental for me as I will be trying some weathering powder techniques, but more on that next time.
I hope someone out there found some of this useful.


Thanks for this tutorial how do the cheap craft paints hold up over time?
ReplyDeleteNeat. I am looking forward to part 2 witht he weathering. I do a red wash on the nose of dwarfs to get that drunk look going but thats about it. I might try the red wash & stubble wash out on a few other models.
ReplyDelete@D Willhelm. This looks a lot simpler than I imagined and I'll have to try your technique step by step. What's in the parchment basin? Is it a box with wet tissue paper at the bottom and then wax paper at the top to hold the moisture in? Where would I get some of it? How long does the moisture keep?
ReplyDeleteThanks for the tutorial very informative. You've reminded me I need to get me a micron pen.
ReplyDeleteRobert Audin,
ReplyDeleteI haven't had any problems with the craft paints fading or anything like that. I spray on a matte fixer and they seem fine. Recently I found a box of minis that were painted over 20 years ago an they held up fine.
Rob S, you inspired me to do Part 2. I am hoping to get it all wrapped up by the end of the day Pacific Standard Time.
Robert Kurcina (Kitrok), The box is full of standard wet tissue paper, moistened and laid flat. It keeps the parchment paper wet from underneath and keeps the paints from drying too fast. Use parchment paper, not wax paper and I wouldn't try to use those tissue papers with lotion in them.
Simon Q, yes you should really give micron pens a try. They are a great time saver.
Thanks guys!
Vary useful indeed. As you have probably gathered I love your 'earthy' painting style and this has given me a window into how you go about achieving it. Merry Christmas!
ReplyDeleteNice tutorial. I like your style and the figure looks good.
ReplyDelete