Overview
A "spray box" is basically a large cardboard box which is used to place unpainted figurines while coating them with primer spray paint. The idea is that the box will isolate how much spray paint travels around during the process.One of the things I've learned since I've first started this hobby is that a "spray box" is really messy. And so I've discovered that if I create a "spray bar" I can minimize my messiness. It also helps to conserve primer spray paint, and allows me to have my figurines neatly organized. This might not work for everyone, but for those people that have mounted their figures upon fender washers this will help. The fender washers are magnetic and will
Things to Get
A pencil.
A screwdriver
A matt-knife with sharp blade
E-6000 or general-purpose glue.
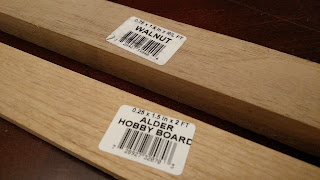
1 x 36-inch wood strip (36" x 2" x 1"). Maybe a heavy wood like walnut.
1 x 12-inch wood strip (12" x 2" x 1/4-inch). A light wood like pine.
16 x 2-inch bugle-head construction screws
16 x 1/2-inch cylindrical spacers such as "compression adaptors"
16 x 3/4-inch ceramic disc magnets (the cheap stuff)
16 x 1-inch fender washers with 1/8-inch holes
16 x 1/2-inch flat washers with 5/16-inch holes
The Steps
 |
| 1/2-inch cylindrical spacers. |
 |
| 1/2-inch flat washers with 5/16-inch holes |
 |
| 1-inch fender washers with 1/8-inch holes |
 |
| 2-inch bugle-head construction screws |
 |
| Some wood bars. |
 |
| Same wood bars at a distance. One bar will be cut into smaller pieces. |
 |
| Score 2-inch marks evenly spaced upon the thicker wood bar. |
 |
| Here are those ceramic magnets. I'm using mine from an older project and so I'll need to clean up the glue. |
 |
| Each of the mounts will use these bits. On a 36-inch wood bar with 2-inch spaces there will be enough room for about 16 mounts. |
 |
| Good ol' E-6000. Sticky. Dries fast. |
 |
| This is what the screws do. |
 |
| Assembled for a dry-run. The smaller flat-washer goes upon the larger fender washer to allow the bugle-head screw to be flush. |
 |
| And upon the flat-washer and screw head we place the magnetic disc. |
 |
| We affix the mount. The warping here is slight enough to allow the screw to recess a bit. Don't drill them in too tight or the head of the screw will break away. |
 |
| Here's with the flat-washer affixed and the disc affixed; both with lots of glue. |
 |
| Cut the thinner pine-wood board into 3-inch sections. I have a sander and so I make the rough edges go away. |
 |
| Again more E-6000 glue. I place paper beneath the end joints to catch any glue run-off. |
 |
| Here's what it looks like with a figure upon the mount. |

