Showing posts with label Dunjon of Death. Show all posts

Friday, February 15, 2019

MEST :: 2.x trying out some Web ideas

Spyider webs!
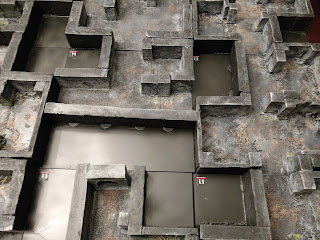
I'm trying out the new Web rules for use with Dunjon of Death. A very big WIP.

Essential ideas;
  • Spyiders  may shoot webbing in the form of Strands. These are [Discard+] weapons at this time.
  • Perform a Range Attack to place a Strand which are 1, 2, or 3-inches in length depending on the SIZ of the Spyider (SIZ 2-3-4).
  • Any bases it crosses are subject to the attack. A character which dodges is moved up to its Agility away from the Strand.
  • Strands stay in place but will decompose. Therefore characters will not want to be in base-contact with them.
  • A character which is entrapped by the Strands must perform an Unopposed Physicality test (STR or SIZ). Upon success, reposition either the character up to Agility away or reposition the Strand away. Maximum distance is equal to cascades.
  • At the end of the Turn, roll 2 Modifier dice for each group of Strands within 1-inch of each other. Failing to score a success removes a single Strand.

Saturday, January 19, 2019

Greenskins I

These are my "greenskins"; the orcs, goblins, gremlins, and kobolds for the Dunjon of Death. Plus a few other figures. Nearly all of my greenskin figures are Reaper Bones because my favorite FLGS is Game Kastle which stocks them.

Scale

According to the scale I've set up for MEST, these are SIZ 4 (for the Orc and the left) going down to SIZ 0 (for the Mite at the right). 200-100-50-25-10 Kg. The Gremlin (SIZ 0) is on a temporary nub since I didn't have an washers of the right size.

I'll eventually pick up some ogres (Reaper Bones) and maybe a couple of trolls. These would likely be SIZ 5 (at 500 Kg).

SIZ 4, 3, 2, 1, and 0. Greater Orc, Lesser Orc, Goblin, Kobold, Gremlin.

Sets

I've got these sets ready to go. Most of them are Reaper Bones figures and are quite soft on detail and soft of material. Meh. They'll be for tabletop use and not for display.

Greater Orcs (Reaper by Tre Manor and Bobby Jackson).

Lesser Orcs

Lesser Goblins. Cave Goblins.

Greater Goblins.

Pathfinder "Common" Goblins.

Kobolds.

Mites. These are actually larger than the gremlins (not shown for now).

Up Next

Hoperfully I get one of the larger sets shown be complete. I can already determine that the Greater Orcs will require a  lot of effort ... each of those may take a while to finish.


Friday, October 5, 2018

Preparing for Dunjon of Death V :: Everything Together For Now!

Link to Part IV

Overview

Here's everything I've got in terms of Dunjon of Death terrain and tiles.

The Dunjon Tile Deck

The original Plan was laid out in an earlier post here.

The idea was to have modular tiles and matching "Dunjon Tile" cards. These cards could be drawn at random and rotated to craft a dungeon crawl layout. The tiles and cards are given an ID and a standard facing such that they can be identified on paper for later retrieval.

Here's the result of that Plan;


This is the set of cards I originally used. The dice and pawn are the result of my Dunjon of Death Generator micro-game to build the dungeon. It is a 6-Tile dungeon (8; 6 + Start and End).

This is a recording of the generated layout. 


This is the new set of demo cards laid out according to my recorded drawing from above. There's two changes; E4 and S4 became L2 and R1 respectively. When I get further along, I'll upload the tile cards on my Downloads page. I'm considering starting a new Google Sites just for Dunjon of Death as well ...

OK. The cards themselves. With this, I can pull through my Dunjon Tile assets and build out my modular game.


I tried my best without a selfie-stick. Here's my tiles laid out to match the cards. I've also added my various terrain elements. Each tile is 12.5-inches across (about 10 MU for MEST). At a total area of 5 x 3 tiles; 60 by 36 inches.

I'll give a tour starting with the START tile. Here's the intrepid murder hobos approaching tile S1.

Here's tile S1. Awaiting them are some Skeleton guards. In my draft rules, there needs to be a necromancer on the layout to control them. This would be a middle-manager type; the Big Bad Evil Guy (BBEG) is probably a lich lord for a later adventure.

Connecting from SI is L2. Spyiders! I'm working on the Web rules; capture not kill. People are food.

Beneath L2 is T2. More undead guards.

To the right of T2 is L2. In my earlier draft this was E4 but I sort of got rid of E4. In terms of Jaquaying the game, most of the dungeons generated are a gauntlet, so something like this E4 is a side-quest. Once I have some treasure or objective markers painted up, E4 would be an ideal place for them.

Here's X1 which is beneath T2. Notice that X1 is rotated facing downwards. To the right is S4 which is the last generated tile.

This is S4 from X1. I used my "pitcher's mound" for a Cornice Pillar. The right is the EXIT tile.

The EXIT tile with a stair case and the Necromancer boss. This is where the daring adventurers from the START tile need to get toward.

More Pictures


So the tour overview is done. Here's some pictures from a lower angle.

View from the START tile into S1.

View from within S1.

The longest hall-way. Excellent for archers. This is L2 going down towards X1.

L2 (nee E4).

T2.

S4.

Dargh ... X1 upwards into T2 I thnk.

EXIT tile. Necromancer. Black foamboard doing a simple job and failing. This reminds me that I need to create some backdrop sheets, not just for Dunjon of Death but for outdoor games as well.

What's Next

I'll need to get back to game design and painting up my other Dunjon Denizens (Orcs, Goblins, Kobolds, Gremlins, and maybe a few dozen Adventurers).

In the Future

I think the set in total is good enough for bringing to a gaming convention. It's been, I think, 4 years since I've done a MEST Tactics demonstration. I'll try for KublaCon or PacifiCon coming in 2019.

Friday, September 28, 2018

Preparing for Dunjon of Death IV :: The Terrain

Link to Part III-F

Overview

Here's where I go into my cache of half-finished terrain elements and paint them! Dunjon of Death has been in planning for at least 2 years, if not earlier ... and I've got lots of stuff to lay out.

The General Plan

Essentially I'll paint them the same as the others:

  1. Base coat of black paint plus clear Elmer's glue. Good news; inexpensive. Bad news; if you get it wet, the glue (and paint!) comes off. Good news; you shouldn't be getting any of your terrain or figurines wet any time soon ... right? No coffee or beer on or near the gaming stuff.
  2. Afterwards, I'll dry-brush with dark grey using a 2-inch brush. Mostly top to bottom strokes.
  3. Next, I'll dry-brush with medium-gray using a 0.75-inch brush. Mostly pulling from the bottom near the tile floor upwards to about mid-height.
  4. Using the same brush and paint, I'll dry-brush from the top down to make details pop.
  5. Lastly, using light gray or white, I'll dry-brush the edges of edge terrain element to make them pop out.

The Terrain

Here's what I've started with;

All the things.

Coat of black + PVC glue.

Dry-brush with dark gray.

Awaiting the medium gray.

Everything is Done

Here's everything painted.


Left side of my table are the recent terrain items.

On the right side of the table are my doors from earlier posts. Remember that these are Zombicide and Dungeon Saga doors.

A Reaper Bones Skeleton Swordsman next to the Central Blocks. These blocks are about 3 by 2 by 2-inches.

Dude next to one of the Cornice Pillars. I have a bunch of cake-shop Greek pillars that I'll need to eventually set up as well.

I've got three stair cases and two stair bases. I just noticed that the fights are all right-winding. And so I'll create some later; maybe a straight stair case, and two L-shaped left-winding.

The Dungeon Saga and Zombicide doors. These behind the Celt are my "Damaged" doors.

OK. And finally the skeleton warrior next to the single-doors; these are both Zombicide doors.

Inventory

Here's my inventory for the curious.
  • 14 Passage Ways (wall with a hole, no door)
  • 19 Single Doors (that's Zombicide)
  • 3 Double Doors
  • 1 Double Door, broken
  • 3 Great Doors, unmoving (that's Dungeon Saga)
  • 1 Single Gate, jammed.
  • 3 Stair cases, right-winding.
  • 2 Stair bases (single short flight).
  • 8 Wall sections.
  • 2 Fallen stella.
  • 6 Wall Blocks (4 plain, 2 crowned)
  • 6 Central Blocks
  • 7 Cornice Pillars
  • Plus ... 25 modular Dunjon of Death tiles (22 square, 3 start/exit which are rectangluar).

What's Next

I'll show you everything I've got put together. 

Friday, September 21, 2018

Preparing for Dunjon of Death III-F :: The Tiles - Done for Now!

VISIT PART III-E

Update

So, this is the final post with the tiles for now because Dunjon of Death needs much more other stuff created and painted.

I printed these out using the Grebb font-face. I'll make the assets available eventually; I just need to confirm that all of the assets work together properly. For example, this sheet has more than is necessary for the tiles since it has tile IDs such as S5 or C5 which I haven't created. And probably won't need to.

Cutting stuff up. There's two sets; one with a red bar for the face of the tiles which I place at the top-left corner. And one matching with a white bar and matching tile ID which I place beneath each removable wall for those tiles with removable walls.

Here's what I mean; top-left red bar. Bottom of removable wall is white bar. BTW, I learned that the glue shown in this picture eats away at styrene ... so it melted my walls where I poured too much glue. Don't be a dummy like me.

These are all of the tiles randomly placed near each other with the tile ID markers always in the top-right.


I tried standing on my dining room chair to get an "aerial" picture. First, the 21 tiles flowed over the table and there was no room for the START and END tiles (per Dunjon of Death). Secondly, I think I need to get a selfie stick.

Here's one end of the 21 tiles laid out.

And here's the other end view. That tiny person is my Little One; she helped me paint some of the tiles black early in the project. 


In the Future ...

Here's an example of what can be done with electronic tikki-light torches.

Here's something I'll blog about once I find the ideal solution. Essentially this is a tea-light LED which flickers when given a 3V coin-battery power source. If you look close those wires going beneath the bulb are the leads and they'll cut into the walls. The other side will be the wiring and power source. The square panel could conceivably be switched out for decorations (tapestry cloth, wall column, fountain, etc).

Basically all of the walls with LED torches will be constructed similar to this proof-of-concept wall. At present the 3V coin battery sits atop the wall (5CM) with the wires fed through the center of the polystyrene. The fixture in red is attached magnetically to allow me to remove it and the wires. The yellow strands at the top is actually yellow cellophane from a butterscotch candy treat, and is secured in place with a hot-glue gun.