Friday, November 12, 2021

3D Models

 A while back I got an FL-SUN QQ S-PRO 3D printer

I have been printing a bunch of 3D art (via STL file format) from a bunch of people. I'm learning the limitations of my FDM printer in that it is best suited for larger things such as terrain and buildings. However, I have been working with the Blender app and creating small things.

Thingiverse

I'd like to present to you my two latest creations! Both are now on thingiverse.com.

Spiderbot

This is just something I've always wanted. It is sort of like a tachikoma but without the human pilot inside. I created it using metaballs and simple hard-surface modeling. It is very low detail and the legs are sort of meh. However, it is my first 3D figurine from design, modeling, to printing, and painting! 

I like to think that it will fit into my MEST Tactics settings somewhere, perhaps in Combat Modern. It may also fit into the Mech, Beast, and Infantry rules set. 

Spiderbot Mark-I


High and Low versions. These have turrets which can swivel.


Two Spiders

I always see single giant-spider minis or swarm of small spiders. I have also found three spiders on a disc but never two spiders on a disc. Until now, because I just created it. It is low-detail but it paints up well enough. I mount these on 40mm zinc fender washers. It will be used with my other figurines in the Dunjon of Death and Sarna-len settings within the Fantasy genre.

Two spiders


Painted up. 


Friday, September 17, 2021

MEST :: Play-aides > Tokens and Markers

Overview

I received a nice gift to myself in the mail today !

My prototype for the MEST Tokens and Markers kit arrived. These kit has two types of components; laser-cut 3mm MDF (thick card-board) for the markers, and acrylic tokens with laser-cut stickers for the tokens.

This actually is the physical set, as I have been using Tabletop Simulator to employ the digital versions for about 6 months now. I will likely need to adjust the proportions of the kinds of markers which I'll need as I can already determine that there's maybe too much of one kind or another. Something like this doesn't come easy to my mind when I'm designing the art, and the reality of it in physical form undeniable. I looked at the spacing of the slugs shown and I think I can have more images per sheet and maybe one or two fewer sheets. I am WIP for adjusting this.

Pictures

I'll just upload the lot of these for thumbing through. There will be small comment blocks for each, but I'll summarize way below in paragraph form.

Two sets of 3 slugs.


Slug 1. An 8-MU ruler, a Scatter Diagram, some Resource markers, and two Transfixed with 5 Acid markers. I think the Scatter Diagram is nice but could benefit from having a 30mm hole at the center within that red ring. I'll have to try it out.


Slug 2. Left-to-right are 5 Burned markers, 4 Poisoned markers, 7 ROF/Suppression markers, 2 Emplaced/Fire-lan markers, 3 Out-of-Ammo/Jammed markers, 6 Hidden markers, 3 Victory Point tokens, 4 Initiative Point tokens. The tokens are kept in hand instead of positioned near a model.


Slug 3. Top-to-bottom. 9 Go Point tokens, 9 Objective Markers [ Yellow/Red-or-Blue ], 9 Delay markers, 9 Wound markers, 9 Fear markers. 


Top-to-Bottom. 24 Done markers, a slug of stickers, 24 Wait markers. I got an extra Wait (clear) disc with my purchase. 


A note which came with each slug. I sort of crumpled it, but the message is essentially "this stuff has soot and will smell". The soot is also sort of hard to clean, but I used a wipe and did my best. Be sure to clean your fingers after you finish handling these laser-cut elements as well.


The kit's very flat 3mm-thick MEST Ruler at the bottom. A bit flimsy but serviceable. The five green sticks above are hand-made and I like them much better. I think with the final published rules what I will do is have a small section or small booklet on hobby crafts.

At the left are my home-made Initiative Point tokens. At the right are the laser-cut ones. The home-made ones are hefty wood. There was close option for that at the Game Crafter made from 3mm plastic but it would have required even more stickers.

Left are my Go Point tokens, Right are the laser-cut ones. Again, the home-made ones are hefty because they are stickers on wood. There was no equivalent for the size on the Game Crafter except for some thick laser-cut acrylic at 25mm. But it would have been too fancy in comparison to the more "valuable" IP tokens above.

Here's where the laser-cut stuff begins to be more impressive. These are Wound markers and I like the nice size for the ones at the right with the inset artwork.

Fear markers. The skull on the yellow laser-cut markers are very nice.

Delay markers. Nothing shouts "Distracted" as a nice donut with a line through it.

Hidden markers. The laser-cut markers are nice in comparison to the gemstones on the left.

At the left are the Out-of-Ammo! [ top ] and Jammed! [ bottom ] home-made markers which are stickers printed from my color laser-printer affixed to 0.75-inch bingo chips. At the right are the laser-cut ones from the kit which look much better to me. A bit smaller as well.

These are the Burned markers. The laser-cut ones are the correct size for a Hindrance identifier. I've been using them in my play-testing and the home-made ones are just too big.

These are Poisoned markers. Like Burned, Delayed, Wound, and Fear these are Hindrance identifiers and are all the same small size. At the left is my too-large home-made version.

These are the ROF and Suppression markers. At the right these are double-sided with the top ones being ROF. Those are placed and then are flipped to the bottom image to represent Suppression.

I am really happy with this one. At the left is my single home-made Confused marker. At the right are the laser-cut versions. The top is a Confused marker, and the bottom is a Transfixed marker. Both are Hindrance identifiers.

Out of all of items from the kit, these Done tokens and the Wait tokens below are my favorites! At the left are my home-version as a big blue glass bead. At the right are the acrylic discs with stickers on them. I've been using this version via Tabletop Simulator.

The Wait tokens. At the left are my clear glass beads. At the right are the acrylic discs with stickers on them. These discs are the same diameter but thinner than the blue Done tokens and are meant to be stacked together when positioned next to a model.

Summary

I really like the new laser-cut kit and the acrylic tokens. I think it provides an professional quality to any MEST Tactics enthusiast and I hope to make them available to others soon. Players won't need to purchase these and may always use their own set of home-made markers and tokens just as I have done. 

I designed the kit to allow enough markers and tokens for up to 24 models. This number is I think the largest any MEST Tactics game could comfortably manage. It certainly is the limit I've experienced when I've hosted bashes at my work-place and at the gaming conventions.

I looked over my proportions for each of the markers and I think I could make some adjustments on their numbers. I think I provided too many Delay and Fear markers and I could use the excess when I re-jigger the counts to become additional Burned, Poisoned, or Transfixed markers instead.

With the custom cards, the custom dice, and these custom markers, I have nearly everything I need to start focusing on a specific setting. I'll discuss that soon and lay out my next steps.

How everything looks together.


Friday, September 3, 2021

MEST :: Play-aides > Cards

Overview

I created several decks of cards via The Game Crafter for use with MEST Tactics. I received them a while back but apparently I've never shared them. These are meant to be used with the game system and increase the re-playability extensively.

I have not yet created the tuck-boxes but when I do, these will be available for downloads and also via the Noble Pursuits TGC shopping portal ... which for now is not yet public. Older versions of the cards are available at the Google Sites URL at https://sites.google.com/site/mesttactics/downloads

Pictures

The entire set

All decks for MEST 2.x bagged.


Agenda deck. These are used with the Faction rules.

Resource deck. These can be used in conjunction with Objective Markers. Use with Scholars.

Spell deck. These for use by Sorcerers.

Tactics deck. For use with Tacticians.


Friday, August 20, 2021

All Things Zombie > Generator

 Wow.  How time flies.

Overview

Take a look at this link which goes to my Generator project at https://robert-kurcina.github.io/generator/projects/ATZ/index.html

I created this JavaScript project a long time ago (around 2008 or 2009) back when jQuery and ThemeRoller were still fairly hot stuff. I never uploaded it until recently, and not until just a few days ago did I decide to host it using GitHub Pages.

Derp.

All Things Zombie is a game by Ed Texeira of Two Hour Wargames. It is one of the most thematic TTWG ("Table-top Wargame") featuring zombies and a survival arc unfolding across several books. Zombie outbreak. Zombie survival. Gangs. Cops. Military. Civilians. All surviving, hunting and foraging, and avoiding trouble ("PEF" or "Possible Enemy Force").

Features

The ATZ Generator was designed to be forked and utilized as a library. It has several features which build upon each other.

Dice Roller

This is a universal library of sorts. Of course it can be improved, but it generates dice rolls via directives such as "2D6+2". It can also be invoked using a method such as foo.rollDice(4,6)


Name Generator

This uses a list which can be edited, and outputs randomly generated names of characters.

Data Tables


There are several data tables. These essentially come from the All Things Zombies game books. Here's an example of the Armory Information table.


Character Generator


This benefits from the Name Generator and the various Data Tables mentioned above. Again as a library, it can generate specific types of characters using directives such as 2xSurvivor-F for "Two Female Survivors" or 1xMilitary for "One Military Character".

These look like the sample below when in data table mode:

Character Roster


But wait, there's more! This is best part!

The characters can be generated as poker-sized playing cards. Full color. 2.5 x 3.5-inches. You can use the generator to create thousands of characters, and print them out and sleeve them.

The idea is that this format can be used to quickly generate a deck of PEFs which can be shuffled and used for game-play. Here's an example of just 6. 


Campaign Generator


I didn't get to finish this, but it generates a series of encounter settings which chain together to form a campaign. You can give the campaign any sort of name, but it defaults to "The Forsaken".


Map Generator

This is also not finished. It generates a battlefield for use with All Things Zombie. It is supposed to merge into the Campaign generator. Anyhow, you could set some parameters and change the output size. I've used it to create really large tiles by setting the cell size on the input forms. This creates a map which is big enough for my models to sit atop.


Conclusion

Although this project was never complete, and is really really old (like 12 years ago), I hope that somebody can find it useful. Maybe they can fork my project and build other generators for other games, or maybe merely finish my rudimentary implementation and make it better.


Friday, August 13, 2021

Large Office Building

Overview

This one has been in its incomplete state for years. I finally got around to providing some exterior paint.

The building is really large and will serve as the central point of interest for many games. It is two floors tall plus a roof. Each floor is really just a large hallway which I can and will eventually partition with doors which will allow the interior to be modular.

Pictures

Here they be.

Internal with some partitions.


Partitions removed.


Flat black primer on the first floor section.


Aerial view with my new black-top road sections.

Back entrance near the chimney.

Some rough marshy terrain leading to the back entrance.

Aerial view three-quarters turn.

Side entrance is guarded by a copper.

The Green Door entrance. And also the red-carpet entrance.

Above it all. You can see the roof-top trap-door entrance.

Friday, August 6, 2021

Quick and Easy Tarmac Roads

Overview

For many years I've been looking around for a quick way to create black-top roads for my 28mm wargaming needs. I found a lot of interesting solutions, but not with which I was satisfied.

Here are the other methods:

  1. Buy 3D-printed terrain.
  2. Buy laser-cut wood terrain and flock with grit.
  3. Make the roads using MDF and some sand.
  4. Make the roads using sandpaper mounted atop some MDF or plasticard.
  5. Make the roads using roofing shingles.
  6. Full-color 2D paper prints.
So, I didn't like any of them. Here's why:

3D-printed terrain

Very expensive. The scale is usually 20mm posing as 28mm making them too narrow. I have a 3D printer which can save on the cost, but it will be time-consuming.


Laser-cut Wood

Too expensive. Otherwise, very nice.


via Firebucket Games


via Cross-over Miniatures


MDF and Sand

Nice looking stuff. Too much work for me. Maybe next time?


Sandpaper and MDF

Acceptable. Too much work for me. I tend to create terrain in bulk and this would be too slow.

Roofing Shingles

Ah. Just about right. However, I didn't want to pay too much. I also couldn't figure out how to cut curves into the shingles. 
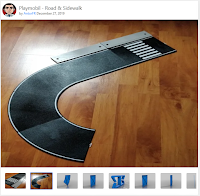
via Jay's Wargaming Madness


Full-color 2D Paper prints

I did this ... and it didn't look too good. Too flat and color was hard to get correct.

My Solution :: Foam paper

This solution works for me because it is cheap and it is easy to do. It won't win diorama prizes but it looks good enough for use in person and looks decent for photo ops.

My local Michael's Art Supplies now stocks materials for cosplay designers. Foam paper comes in several colors, and I chose black for my road's base color. I purchased in bulk, and so got a 60x30-inch roll of this stuff. 

So, with that here's my tutorial.

Supplies needed

  • Black foam paper. see above.
  • Medium Gray paint. Darker is better.
  • A coral sponge. The flat kind with lots of crannies.

Step 1 :: Determine Road Widths

In the USA, a two-lane road is about 24-feet wide before any road shoulders. 

24-feet x 12-inches per foot = 288-inches. 
  • At 1:43 scale this is 288/43 = 6.7-inches. 1:43 is the scale of my die-cast vehicles.
  • At 1:56 scale this is 288/56 = 5-inches. 1:56 is 28mm scale, which is most of my minis.
So. Decisions. Decisions.

I fudged this to be about 6-inches so that I could do easy math for cutting shapes. This makes them 288/6 = 1:48 scale.

Step 2 :: Straights

I created straight-road sections 6-inches wide and either 9-inch or 18-inch in length. Two of each of those. I also created a large set with one each of 24-inch, 36-inch, and 48-inch sections. These latter are for highway scenes on a 4x4-foot board. 

Step 3 :: Intersections

These are the T-section and the X-section connectors between roads. These will fit within a 12x12-inch box if the roads are 6-inches wide. The roads join with a curved corners. Take a look at these pics. The corners have a radius of 3-inches. If you are using 4-inch or 5-inch road widths, these corners could be 2-inch or 2.5-inch in radius. 

Or not. Up to you.

I created two copies of each intersection type.

A T-section. Grid cells are 3x3-inches


An X-section. Grid cells are 3x3-inches


Step 4 :: Elbow Curves

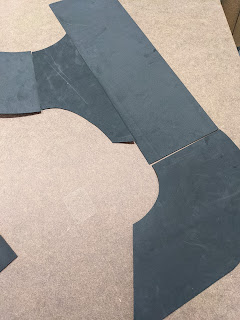
Ack. These are hard to do without a nice template or large compass. Really don't need them. I eyeballed mine and just made sure that the entrance and exit edges were 6-inches across.

Step 5 :: Cut It Out

Yep. As necessary. I usually go big and I cut out a lot for later use. Never know when I'll need them for a 4x8-foot board.

Step 6 :: Daub with Medium Gray

This is all technique. 

  1. I poured some Medium Gray craft paint atop a piece of scrap foam paper and took the (a) sponge and soaked it. 
  2. I daubed the edges of each road tile along its length and let it dry. This is for about half-an-inch on each edge. I rotate the sponge as I go.
  3. Let the paint dry by working on multiple pieces.
  4. Afterwards, I use more paint but I lightly layer the daubing and move progressively inwards from the road tile edges. About 2-inches inwards.
  5. Again. Let the paint dry. 
  6. After that, I just lightly touched-up the areas where the paint doesn't show up well.

Step 7 :: Lane Markings > NO!

My roads do no use lane markings at this time. 

Sensible marking patterns are in white for lane division headed in the same direction, and yellow for a divided opposing traffic directions. And then there are solid-yellow and solid-white divisions for highways instead of urban roads. 

There's too much variety to be fair to actual implementation. I'd need a set for highway, rural, and urban. And then for 2-lane unified traffic, divided 2-lane, and something for when within an urban environment.

These were introduced in 1917 within the USA and they vary by country and time.  Not every road had these lane markings, and the Pulp & Mythos TTWG stuff I care about would benefit by being "authentic" and I suppose in the future I will flip each of my road tiles and add some additional paint to mimic some lane markings but I don't see a need now.


USA lane markings


Solids and dashes.


The Results

Here's a series of pics showing my progress.