
Disclaimer

Interior Doors
In this tutorial I'll be using the template shown at the right to construct a swinging interior door meant for use in 28 MM to 33 MM environments which corresponds roughly from 1:56 to 1:48 scale. This particular template is for short doors and they stand about 40 mm x 25 mm in size.Materials and Supplies
You'll need to have a wall made of foamcore, a matt-knife to cut things, some rubber cement, some wood glue, and an awl. Plus print out the template at full-size; it was designed for 8.5" x 11" Letter but A4 won't cut too much off because the template contains multiple copies of the line art necessary for this tutorial.I also wanted to have fancy door knobs and so I purchased really small paper fasteners known as "brads". You'll want a metal ruler with metric markings to guide your efforts on measuring and cutting.
Steps
 |
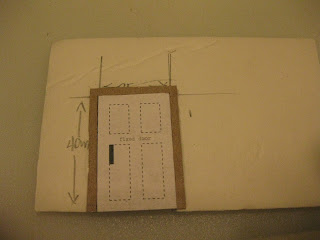
| I started with this. Use rubber cement and glue the template to some cardboard. Don't make the glue permanent. |
 |
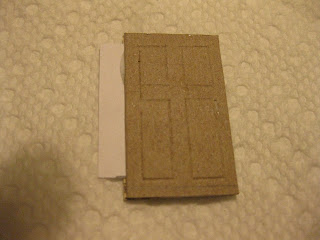
| I cut out all of the parts for one set. The swing doors are what I'll want. |
 |
| Cut out a 40 mm x 25 mm rectangle into the wall to hold the swing doors. |
 |
| Use wood glue and set the frames on to both sides of the wall. Use your fingers to ensure they are mounted flush to the hole. |
 |
| Here's what the fixed door would look like if affixed to the frame. It looks nice and could serve well for most interiors. |
 |
| Use an awl and scratch the cardboard along the dotted lines for each of the swing doors. Peel off the template when done. Also, cut a slot into each door at the black rectangles. |
 |
| Cut out a small piece of paper and glue it between both doors. This forms a tab. The doors are glued back-to-back. Line up the slot cuts. |
 |
| The glue will not spread evenly, so be sure to place a heavy weight upon them to squeeze the cardboard together until the glue dries. |
 |
| Here are those paper fasteners that I use. I need one for each door knob. |
 |
| I clipped them a bit to make them shorter because my doors are sort of thin. |
 |
| After pushing the brads through each side this is what my door looks like. |
 |
| Trim and glue the paper tab between the frames on to the foamcore. |
 |
| Here's what it looks like from the back. |
 |
| The door will swing enough to open when dry. This is a 40 mm door and the figure is about 35 mm with base. |
Nice work there!
ReplyDelete@styx; thanks, as usual. =)
ReplyDelete