Overview
This is a tutorial that I've been building using Adobe InDesign. It is for a small cottage that measures about 4.50" x 3.75" in size. I'm still in process but I want to get what I had out there before I forget. I'll share those using Google Drive eventually.
Materials, Supplies, and Equipment
I used basswood clapboard and wood-flooring in my project. I also used some laser-etch spruce for my doors and windows. In the PDF that I'll provide I've given proxies that can be cut out and used instead. As for equipment and supplies; these would be the usual suspects such as glue-gun, wood glue, matt-knife, metal ruler, cardstock, cerealbox paper, styrene, foamcore, acrylic paints, paint brushes, etc.
The Photos
Here's what I've got as far as photos.
The Templates
 |
| Template for all four walls. |
 |
Template for floor. Includes two proxy
floor patterns in lieu of basswood
floorboard material. |
 |
| The roof and support. |
The Walls
 |
| Cut out the wall and floor sections from foamcore. |
 |
Glue and trim the clapboard to the walls.
Glue and trim the floorboard to the floor. |
 |
Clapboard is cut with a direction.
Ensure that the groove is facing down. |
 |
Build the chimney. It's about 2" wide at the bottom
and about 6" tall. About 0.75" wide at the top.
Brick pattern is from this other tutorial |
 |
| Melt the styrene |
 |
Build the hearth.
Score the inside face of the chimney. |
 |
| Dig out the interior. |
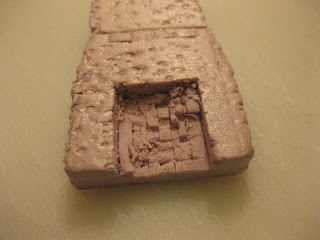 |
| Continue this until the hearth is deep enough. |
 |
Use the hot-glue gun's nozzle to melt any
remaining particles within the hearth. |
 |
Cut a hole in the north wall section about 1" x 1".
It should line up with the chimney stack and hearth. |
 |
Build a fire-place out of three pieces of
styrene. Glue it about 0.25" above the
bottom of the wall. |
 |
| Here's what it should look like. |
 |
Glue the chimney stack to the outside
of the north wall. |
 |
Reduce the sides of the walls by removing
about 0.25" of foamcore on the sides.
This will need to be done for the bottom
of the north and south walls as well. |
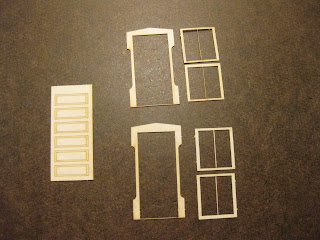 |
I got these laser-etched windows and door from
Rusty Stumps. The PDF I'll provide has
proxies for these. |
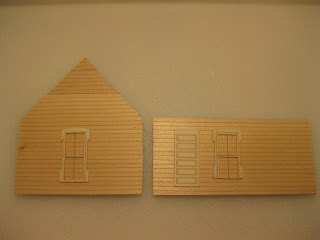 |
I positioned the door and windows.
The templates can only do so much. |
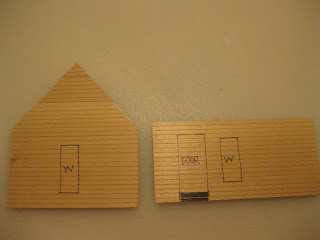 |
| I marked the positions and dimensions. |
 |
Here's where I carved the holes.
The door is fixed and doesn't need a portal. |
The Roof


Thanks, I am going to print this at work and setup to do this after the holidays!
ReplyDeleteWow thats looks awesome. Thanks for the tutorial.
ReplyDeleteVery interesting. Thanks for share it.
ReplyDeleteNice job, I'll check out Rusty stumps for those widows and doors.
ReplyDeleteCould you put this into a PDF to download? I wanted to print out those templates but when I cut and paste to word they go all weird!
ReplyDelete@styx; I'm still working on the PDF but I'll have it soon. In the meanwhile try printing the image directly after downloading it. It is at 150 DPI which should be proper resolution.
ReplyDelete@Brummie; you're welcome!
@Senyor Verd; thanks!
@Scott; cool. Rusty Stumps 0-scale stuff is 1:48 which fits most 28 - 33 MM figures.
Nice work Robert. The finished product looks great!
ReplyDeleteI cross-posted your last few updates on LAF by the way.
Very useful post Robert!
ReplyDeleteLooking good!
@aggro84; thanks, buddy. You got me started on this stuff and it seems to be something I like to do. I'm glad that you like these!
ReplyDelete